A Guide to Making Plaster Soft Bait Molds & Swimbait Molds
 When you are making soft plastic fishing lures, you need to make a good mold first. You can use Plaster of Paris for this. Hobbyists’ find this product okay to use, it definitely is not their favorite. Additionally, this product is not the best when making a large volume or for production manufacturing. Keep visiting this site to see more alternatives in one of our upcoming articles!
You can use aluminum pie pans for this because they are relatively inexpensive and your mold won’t stick to them. Once your swimbait mold has dried, you need to apply a sealant to it like Mod Podge; this will make the mold harder and fill in any tiny pores, as well as preventing imperfections. If you don’t apply a sealant then your plaster will eventually break and tear apart, and your worm will end up sticking to it. Applying the sealant is easy; you can use any type of paintbrush, even your kids.
Our Top PickIt is possible to design your swimbait mold in various ways. You always can modify a bait that is already on the market for your personal use, or you can create your design from either clay or wood. Personally, using clay is the best way to make a design. You can bake it in the oven to watch it harden, similar to baking homemade play dough after your kids make it. When it is done cooling, apply a coat of the sealant. Once that coat has dried, you are now ready to make your mold; at this point, you can take your clay lure and rub a small amount of Vaseline on it to keep from sticking to the plaster. Make sure you do, or you will regret it!
Making Your Swimbait Lure Design
- Make a design out of your clay.
- Harden your design. (Follow the instructions on your box).
- Coat it with a sealant and then let it dry.
- Coat your lure with a thin layer of Vaseline.
Part 1: How to Make a Basic Fishing Lure Molds
- Fill in your small aluminum pan with Plaster of Paris.
- Press your Vaseline-coated clay lure into the plaster and allow the plaster to dry around it. Leave the top of the lure exposed. You should not let any of the plaster touch the exposed portion of your lure.
- Once the plaster is hard, remove the lure.
- Seal the mold cavity with more sealant.
Part 2: How to Use a Basic Swimbait Mold
- Pour the liquid plastic into the fishing molds cavity.
- Let it cool.
- Remove it once it has cooled.
- Place it in a cold bowl of water.
- Remove it from the bowl and let it sit on a paper towel to dry.
- Trim off any excess plastic.
Now that you know how to make your own simple molds, we can show you how to step it up a notch. We are now diving into how to make detailed double molds. A double mold allows you to make a full casting of your design, similar to that of the injection mold.
A Guide on How to Make an Advanced Double Fishing Bait Molds
- Fill your small aluminum pan halfway with Plaster of Paris.
- Press your Vaseline-coated clay lure halfway into the plaster, once again leaving the top half exposed. Make sure that one side of your lure is close to the side of the pan by at least half of an inch.
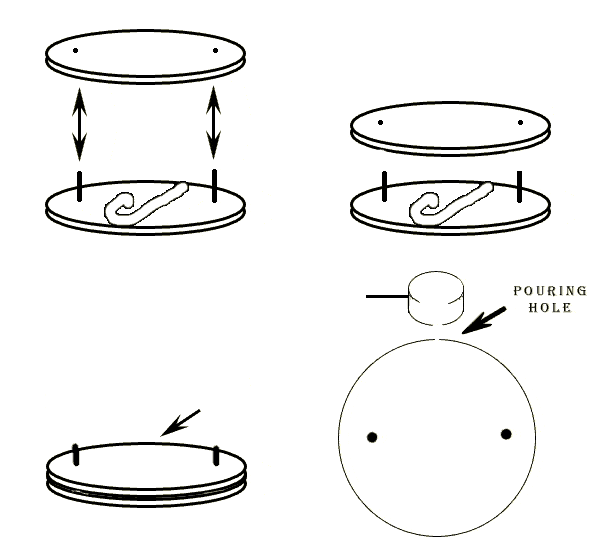
- Add 2-3 Vaseline-coated bolts into the plaster so that they are sticking up from it. These bolts will serve as your guide for when you pour the second layer of your mold into the pan.
- Allow the plaster to harden around the lure.
- Coat the plaster with a thin layer of Vaseline.
- Now, you can pour your next layer of plaster so that your lure is now completely covered. Pour enough into the pan to fill it to the top.
- Allow it to dry.
- After it dries, carefully, turn your pan upside down and allow your plaster mold to slide out.
- Carefully separate the molds. To do this, use the putty knife to tap in between the layers. Make sure to do this very softly as you work your way around the mold. It is very important to take your time or you will most likely break it.
- Now you need a pouring hole. You can use a scraper from the craft store if you want. You can now use the scraper to scrape away at the pouring hole from the inside out. This entails scraping from the edge of the mold cavity toward the edge of the mold. Do this on both ends of the molds so that they will line up. Continue scraping until you have a hole big enough to pour plastic through.
- At this point, you will need to make a venting hole to allow air to escape as the plastic is poured in. To do this, you need to scrape another hole from the mold cavity to the edge of the mold in a different area. When you have done this correctly, you should have two holes running from the mold cavity to the edge of the mold; these will be your venting and pouring hole.
- You can coat the inside of your molds now with the sealant and then let it dry. You can also coat around the outside of the hole in case you overfill it, or you miss the hole. This will prevent the overflow of plastic from mixing with the plaster, so you can use it later.
How to Use A 2 Part Mold
- Connecting your molds together so that they line up with the bolts.
- Pour the liquid plastic slowly into the pouring hole of the mold.
- Fill the mold until it is just about to flow through the pouring hole.
- Allow it to cool.
- Pull the sections apart.
- Remove the now cool lure.
- Place it in a cold bowl of water.
- Remove it from the water and place it on a paper towel to dry.
- Trim of any excess plastic.
If you follow the instructions it is that simple! I hope you give it a go and I guarantee you will enjoy your fishing so much more with your new molds that you have made personally by yourself, plus think of the money you will save with do it yourself soft plastic molds!


